What's New
Showing the stages of a Papercut.
Progress of a Papercut
10/03/2015
I have been creating a papercut depicting the countryside around my village during one of our snowier winters, and this shows the progress through all the stages.

First the background is painted in watercolours to represent the sky & the snowy ground.

The second layer shows the skeleton of trees - some of this will show through gaps in the upper layers. Some paint was misted over to look like snow on the branches.

The next layer is made out of card which I have painted roughly to represent shadowy areas of snow, and is cut and pierced to show areas of background.

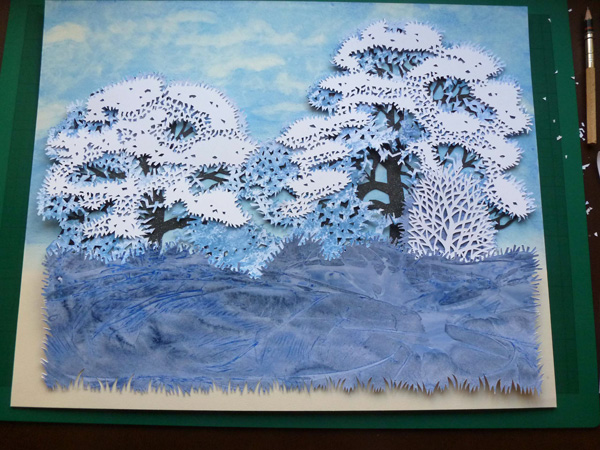
Highlights of white snow form the next layer, and are pierced through the card to show the lower layers. All the layers of card so far were then glued together firmly, and attached to the background.

Between the back section of the trees, and the front hedge I put a small bush, cut out in two layers to echo the blues and whites in the trees.

A dark background for the front layer of hedge and field went on next.

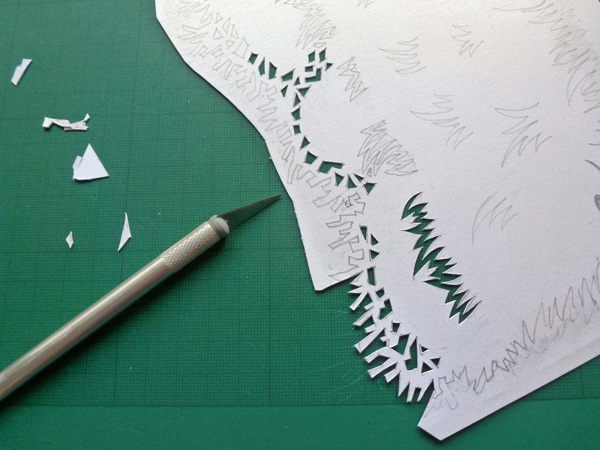
Cutting the last layer in white card.
All my cutting is done by hand with a sharp scalpel, with the design drawn on the reverse of the card. By cutting from the back I can get a cleaner cut surface.
The details included cutting shapes out completely, and leaving others to be creased and folded outwards.

I like to make my papercuts quite 3D in depth. Most of the layers have a sheet of thin foamboard glued behind them so that they all stand out from the layer behind, helping to enhance the perspective.
As there are holes through most of the layers, this means that the foamboard also has to be pierced so that it doesn't show from the front.
This technique means that the process is quite slow and complicated, and my papercuts take a long time to produce.
The finished papercut after glueing together the last layers - "Winter White".
The front layer represents the snowy hedge and tussocky field in front, with footprints of a small mammal running through it.
A hand-painted card cut-out barn owl completes the story.

First the background is painted in watercolours to represent the sky & the snowy ground.

The second layer shows the skeleton of trees - some of this will show through gaps in the upper layers. Some paint was misted over to look like snow on the branches.

The next layer is made out of card which I have painted roughly to represent shadowy areas of snow, and is cut and pierced to show areas of background.

Highlights of white snow form the next layer, and are pierced through the card to show the lower layers. All the layers of card so far were then glued together firmly, and attached to the background.

Between the back section of the trees, and the front hedge I put a small bush, cut out in two layers to echo the blues and whites in the trees.

A dark background for the front layer of hedge and field went on next.

Cutting the last layer in white card.
All my cutting is done by hand with a sharp scalpel, with the design drawn on the reverse of the card. By cutting from the back I can get a cleaner cut surface.
The details included cutting shapes out completely, and leaving others to be creased and folded outwards.

I like to make my papercuts quite 3D in depth. Most of the layers have a sheet of thin foamboard glued behind them so that they all stand out from the layer behind, helping to enhance the perspective.
As there are holes through most of the layers, this means that the foamboard also has to be pierced so that it doesn't show from the front.
This technique means that the process is quite slow and complicated, and my papercuts take a long time to produce.
The finished papercut after glueing together the last layers - "Winter White".
The front layer represents the snowy hedge and tussocky field in front, with footprints of a small mammal running through it.
A hand-painted card cut-out barn owl completes the story.
